Standard Filters
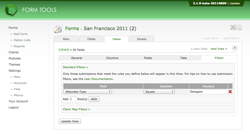
A standard filter is where you limit the submissions that appear in the View by comparing the actual value in a form field to a value or values, specified in the filter. For example, click on the screenshot to the right: it shows a single standard filter that limits the results to submissions that have the value "Delegate" for the Attendee Type field. In other words, the View only shows Delegate and no other Attendee Types
You can assign that view to a client account so that when they log in they only see submissions from Vancouver.
Since standard filters are entirely customizable, you can construct them for whatever is relevant for your form.
Creating a filter is pretty self-explanatory, but here's a few comments about some of the less obvious things.
Operators
The second column on the View filters page lets you choose your "operator". An operator is just a logical rule like "==" (equals) or "!=" (not equals). There are two sets of operators which appear, depending on the form field you selected.
- Date fields: If you have selected a field with the "Date" field type, the operator dropdown will contain two options: "before" and "after". Click on the calendar icon to see a javascript calendar, to help you select and input your date in the right format.
- Other fields: for all other fields, you will see three options: "Equals", "Not
Equals" and "Like".
- Equals: The submission field must be exactly equal to the value or values defined in the values column for it to appear for the client (N.B. I don't believe this is case-sensitive).
- Not Equals: The submission field must not be equal to the value or any of the values defined in the values column for it to appear for the client.
- Like: The submission must be "like" the value entered, in other words it must be a string that contains the string found in the values column.
- Not Like: as you'd expect, the opposite of "Like".
The two pairs "equals/not equals" and "like/not like" are similar, but different. For technical readers, the "like" operators correspond exactly to the SQL "LIKE" clause: they allows you to do pattern matching on the form submission content - not strict tests for equality.
For example, consider these two rules:
- Submission ID, Equals, 10: This will filter out everything except the single submission with the submission ID value of 10.
- Submission ID, Like, 10: This will show any submission whose submission ID contains 10, so : 10, 100, 101, 102, 4010, etc.
Values
This is where you enter the string value or values that you want to filter on. Like with the "operator" column, the contents of this column will change depending on whether you selected the Submission Date or Last Modified field or not. For the submission date, you will see a textbox and a calendar icon. Clicking the icon will open a javascript calendar where you can choose a date and time.
Remember that for dropdown fields, radio buttons and checkboxes, you need to define the field value not the label here. Form Tools always stores the values of the form fields, not whatever the label happens to be.
Multiple Values
To save you the bother of having to define multiple, similar filters for the same form field, you can use the pipe ("|") character to list multiple values for a single filter.
For example, if you had a form containing a "department" dropdown and would like to filter out all submissions other than those headed to the Arts or Humanities departments, you could use the "Equals" operator, and enter "Arts|Humanities" in the values string. If you would like to show everything except Arts and Humanities, you could use the "Not Equals" operator, and use the same "values" string. Hopefully, this should work the way you would expect, but here's a breakdown of the logic for both cases:
IF: (("field A" EQUALS "Arts") OR ("field A" EQUALS "Humanities"))
THEN: show the submission.

IF: (("field A" DOES NOT EQUAL "Arts") AND ("field A" DOES NOT EQUAL "Humanities"))
THEN: show the submission.
The following page contains three more examples for common uses of the filters.
